Organization Manager
This is the main way to give people access to devices in Yggio. Build the tree, put people in it, share resources into it, and who can reach what follows from where each person sits.
Access rights on a single resource and user groups are the fallback, for the cross-cutting cases a tree cannot express: somebody who needs one device from a branch they do not belong to, or a set of people assembled across organizations. Reach for those when an organization cannot express the sharing you want.
An organization is a tree of units that resources are shared into, and members are given access at a point in that tree. Share a device at a unit and everybody with access to that unit can reach it, including everybody further up.
If you have managed permissions in a file system, you already know the shape. Units are folders, resources are files, and access granted on a folder reaches everything inside it.
| Term | What it is |
|---|---|
| Organization | The whole tree, its members and the resources shared into it |
| Root unit | The top of the tree. Usually renamed to the organization name |
| Subunit | A unit inside another unit |
| Member | A user account belonging to the organization |
| Resource | A device, app, connector, report base, basic credentials set, dashboard, image, geofence or device group |
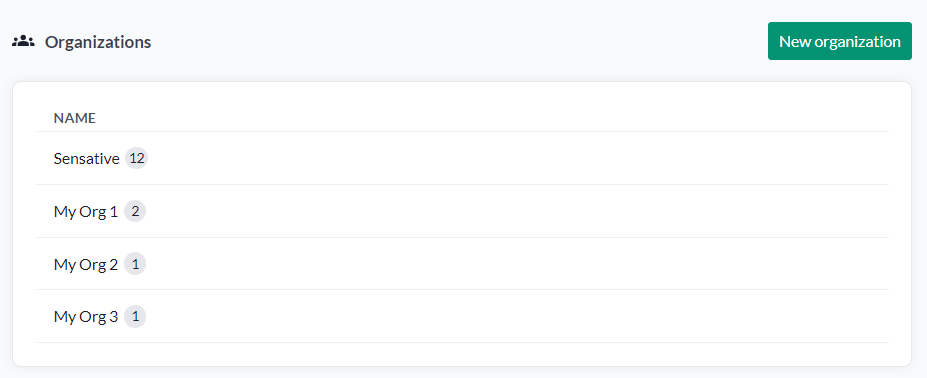
Organizations in the top bar lists every organization you can reach, with its member count. Opening one puts you in its tree, with the unit hierarchy in the sidebar.
The rest of this page follows the product in three parts:
- The organization - Manage organization: the organization itself, its members and contacts, and what is shared into it. It grants nobody access to anything.
- An organization unit - where access rights are granted.
- Branding - the organization's Branding tab: your own name, logo and colours on Yggio.
Start here
The quickest way up
One unit, and no tree to design:
- Create the organization. It arrives with a root unit; leave it at that.
- Add your people on the Members tab, then grant them access on the root unit's Unit members tab.
- Set Share all resources? to Yes for at least one member. Everything that member owns is shared at the root from then on, and everybody with access there can work with it.
That is a running organization. Subunits are for when different people should see different parts - add them when that happens, not before.
A first organization, end to end
Access rights are set on a unit, not on the organization. Manage organization has no permission chips; select a unit in the sidebar tree, and grant the access there.
- Open Organizations in the top bar and create one. It starts with a single root unit.
- Open the organization and add the people to it, on the Members tab of Manage organization. Adding somebody here makes them a member. It gives them no access to anything yet.
- Click a unit in the sidebar tree. The root unit will do to begin with. Access is granted per unit, so a unit has to be selected before there is anything to grant it on.
- On the unit's Unit members tab, find the person and click the chips for the access they should have: Read, Write, Admin or Peek.
- Share some resources into the unit: set Share all resources? to Yes for a member on the Unit members tab, or share individual devices from Device details or Select many, and device groups by expanding the group in the device list and opening Edit group.
The member can now reach those resources, and you can stop here. Everything after this repeats the same three moves: add a subunit, share resources into it, and grant people access at the level of the tree that matches how much they should see.
Note: a member with no access rights at any unit belongs to the organization but sees nothing. Steps 3 and 4 are what give them access.
How access flows
Two mechanisms, and it helps to keep them apart.
Inheritance. Access granted at a unit applies to that unit and to every subunit below it. Grant a member Read at the root and they read everything in the organization. Grant it three levels down and they read that branch only.
Explicit sharing. A resource is shared into a unit and becomes reachable there. There are exactly three sharing policies, and they are worth knowing apart.
| Sharing policy | What it shares | Where it is set |
|---|---|---|
| Share all | Everything the member owns, in one switch | Share all resources? on the unit's Unit members tab |
| Share a device group | The group, and every device in it | Expand the group in the device list, Edit group, then the access dialogue |
| Share one resource | That resource, on its own | Device details for a single device, Select many for several, or the access dialogue on a dashboard, connector or geofence |
A shared device group stays live, and it is the policy to reach for when the set changes. Everybody who can reach the group reaches the devices in it. A device added to the group later becomes reachable through it without being shared again, and removing a device from the group withdraws it the same way. So different sets of devices can be placed at different points in the tree and then maintained by group membership, instead of by sharing and unsharing one device at a time.
The two combine: a member's access level comes from the units they are granted rights at, and what they can reach comes from what has been shared into those units.
Choosing a sharing policy
The choice follows from who owns the devices, and there are two common shapes.
One central owner. Every device belongs to one account - the property owner, or the IT department. Collect them into device groups along whatever the tree is organised by, and share each group at the unit it belongs to. Group membership is then the only thing to maintain, and one administrator can place different sets of devices at different points in the tree without touching the shares again.
Ownership spread across people. Each device belongs to the person responsible for it - a caretaker for their building, a tenant in their apartment. Each of them sets Share all resources? at their own subunit, and what they own becomes reachable there without anybody central handling it.
The third policy, sharing one resource at a time, is for the exceptions to either.
One share per organization
Every share holds one place per organization. Sharing the same member, the same group or the same resource at a second unit in the same organization is refused, and the first share stays. For Share all the message names the unit it is already shared at - go there, switch it off, then share it where you want it. For a device group or a single resource the message only says it is already shared elsewhere in the organization, so you may have to look for it; the Source button on a Resources tab names the unit it is shared at.
The same resource can be shared into several organizations. The organizations do not see each other's shares, so one device can serve a property owner and their service contractor at the same time, each in their own tree.
Every share reaches the whole path. Sharing at a unit also grants every unit on the path from the root down to it, and each member there gets the resource at the level they hold in their own unit - there are no levels to pick when sharing. That is why a resource shared deep in the tree is reachable by everybody with access further up, and why the unit it counts as shared at is the deepest one it is granted at. Members placed only in a subunit below that unit do not reach it.
The organization
Manage organization in the top left corner opens the organization itself, whichever unit you are in. It has up to six tabs: Summary, Members, Resources and Access details, which everybody in the organization sees, plus External contacts for organization admins and the owner, and Branding for an OEM administrator. Seeing a tab is not the same as seeing what is in it - Members and Access details are open to everyone but show a plain member very little. None of them grants access to anything; that happens on a unit.
An organization is itself a resource, like a device or a dashboard, and like every other resource it has exactly one owner.
Changing that owner, or giving another account admin rights on the organization itself, has no UI yet. Both can be done over the REST API - see Swagger and API access.
Who may create one. Creating an organization needs the platform role admin. Editor, installer and the viewer roles are refused.
Belonging to an organization takes the ability away on top of that: both a user created inside an organization and an existing account added to one are marked as belonging to it, and an account carrying that mark cannot create organizations of its own - being an organization admin makes no difference. An owner who adds themselves to their own organization is the exception, and keeps the ability.
Summary
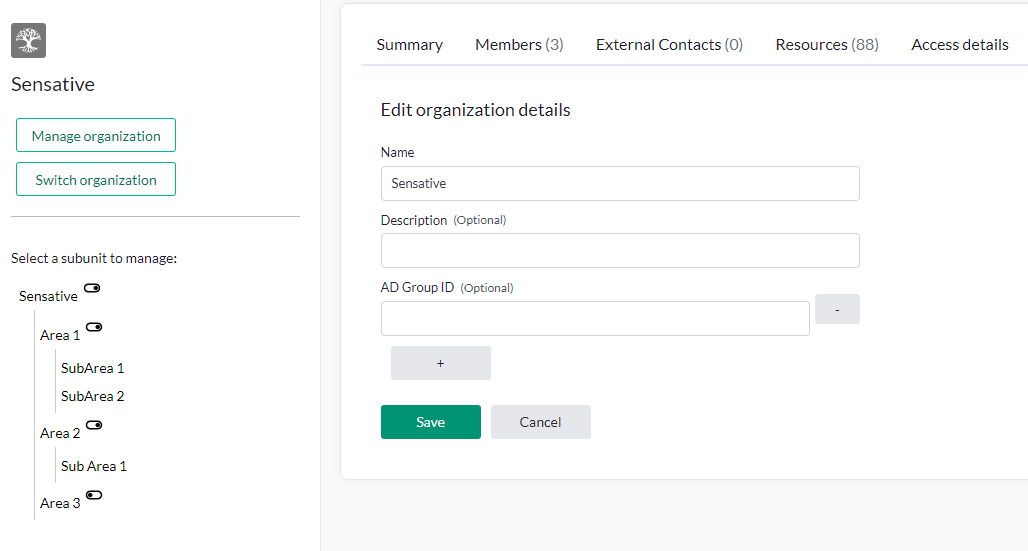
The organization's name, its description and its AD group IDs.
Edit and Delete are shown to the owner alone; an organization admin does not get them. Edit opens the fields above, with + and - to add and remove AD Group ID rows, and Save or Cancel to finish.
AD-group mapping only works where a SAML identity provider is in use. Contact your technical support representative to configure one.
Members
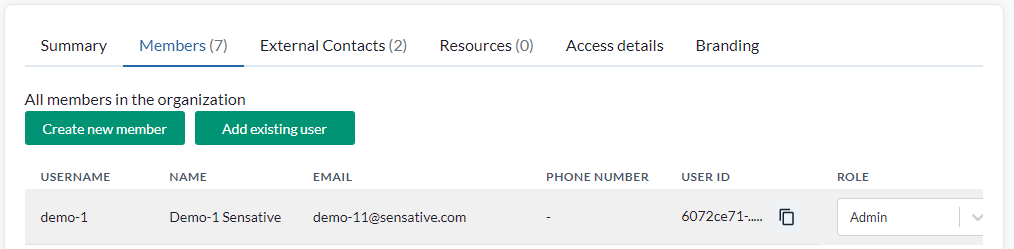
A list of everyone in the organization: username, full name, email, phone number, user id with a copy button, and role. There is no search, so a large organization is read by paging through it.
Everybody in the organization sees this tab, but not the same thing in it. Organization admins, the owner and unit managers see all the members; a plain member sees only their own row, so they cannot tell who else belongs to the organization. Admins and unit managers also see the AD group column, when the organization has an AD group, and the actions for managing each member.
Organization admins and the owner get two ways to add people.
Create new member creates a new Yggio account and puts it in the organization.
| Field | |
|---|---|
| First name, Last name | Required |
| Required. Used for first login and password recovery | |
| Phone number | Optional |
| Username | The login name. Using the email address is common |
| Password | Required. A one-time password is the safer choice |
| Role | The member's platform role |
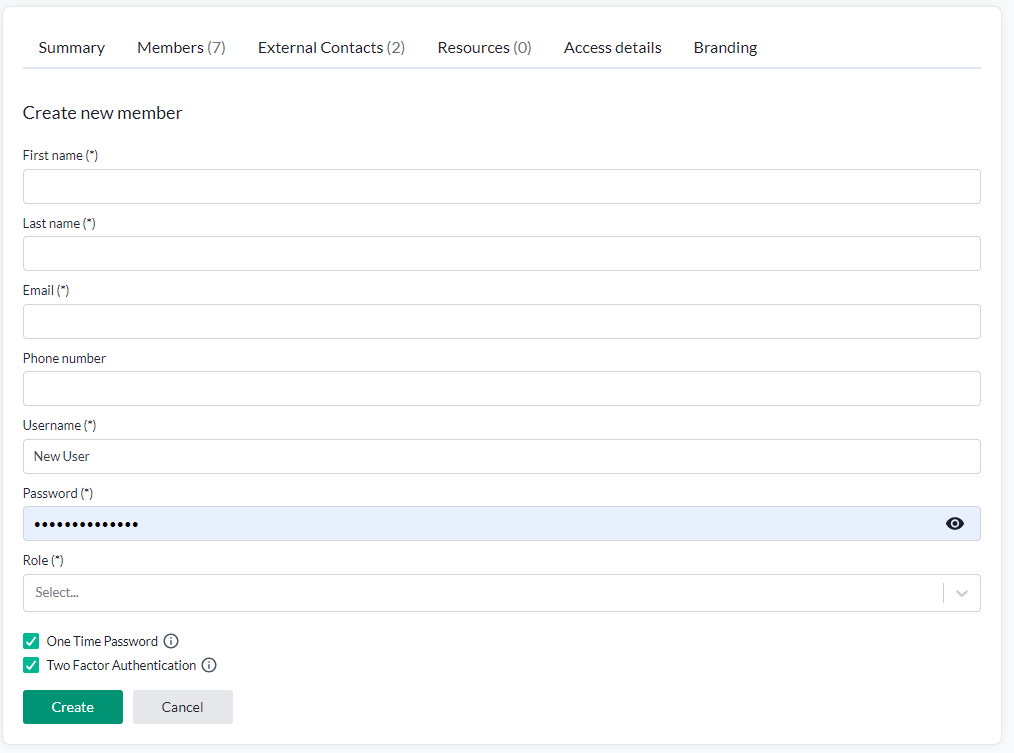
Two-factor authentication is supported and can be switched on here.
Add existing member adds an account that already exists, so one person can belong to several organizations. Enter the user id of the user to add, as shown in the member list of an organization they belong to.
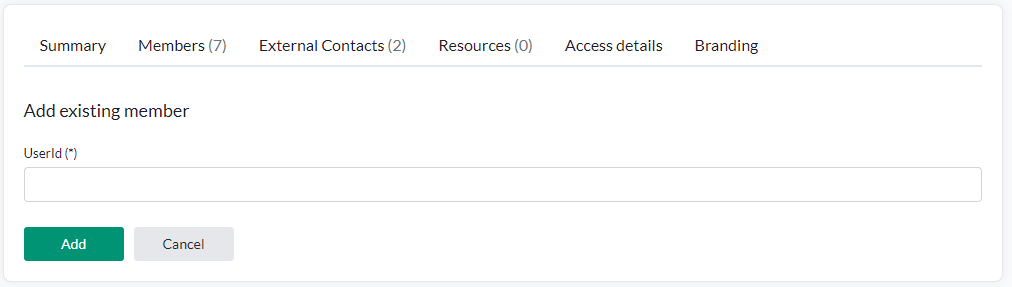
The owner of an organization can add themselves to it.
Member actions
A member's row carries one action, Remove. It takes the member out of the organization; the account itself stays, and it asks for confirmation first.
The button is shown to anyone who manages a unit, but the API is stricter than that, so it does not always go through:
- Only organization admins and the owner can remove anybody. A unit manager sees the button and is refused with "insufficient rights".
- An organization admin cannot be removed - not by another admin, and not by themselves. The button appears on your own row, but pressing it answers "Admins cannot be removed or deleted".
So removing a member is in practice something an organization admin does to a plain member. To take an admin out, remove their admin rights first, over the REST API - see Swagger and API access.
Editing a member's details and disabling an account are no longer possible at all. Both had lost their place in the interface earlier; the endpoints behind them have since been removed too, and now answer 404. A member who needs different details changes them on their own account.
Member roles
Every member's row shows their platform role - admin, editor, installer or one of the viewers. On the rows you may change, it becomes a selector.
Setting a role is not limited to organization admins. If you manage any unit of an organization the member belongs to, you may change or clear their role, and changing a role also requires your own role to be admin.
The interface has not caught up with that: today the selector is only offered to organization admins, so a unit manager sees the role as plain text and has to use the REST API to change it.
Nobody changes their own role - unit manager, organization admin and owner alike - so your own row stays plain text. Ask another admin in the organization to change it for you.
External contacts
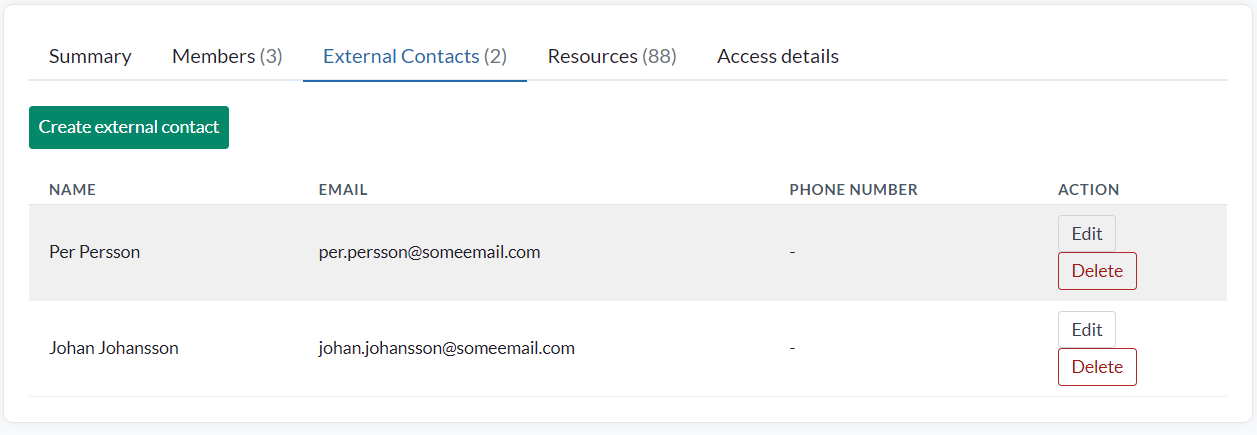
An external contact is an email address and a phone number for somebody who should receive notifications - a rule engine email or SMS - without holding a Yggio account or any access to the platform. They are kept in the organization's contact list alongside the members.
The rule engine offers them as recipients: contacts with an email address in email actions, contacts with a phone number in SMS actions. Remove a contact from the organization and any rule still naming it fails that whole action - the other recipients on it stop receiving the notification as well - so clear it from the rule too.
The tab sits next to Members and shows how many external contacts the organization has. Only organization admins and the owner see it, and only they can change the list.
The list shows each contact's name, email and phone number. Create external contact adds one.
| Field | |
|---|---|
| Name | Required |
| Optional. Must be a valid email address | |
| Phone number | Optional. Enter the number with country code, for example +46701234567 |
Edit on a contact's row opens the same form with the stored values. Emptying a field and saving clears it from the contact.
Delete asks for confirmation, then removes the contact permanently. It cannot be undone.
Resources
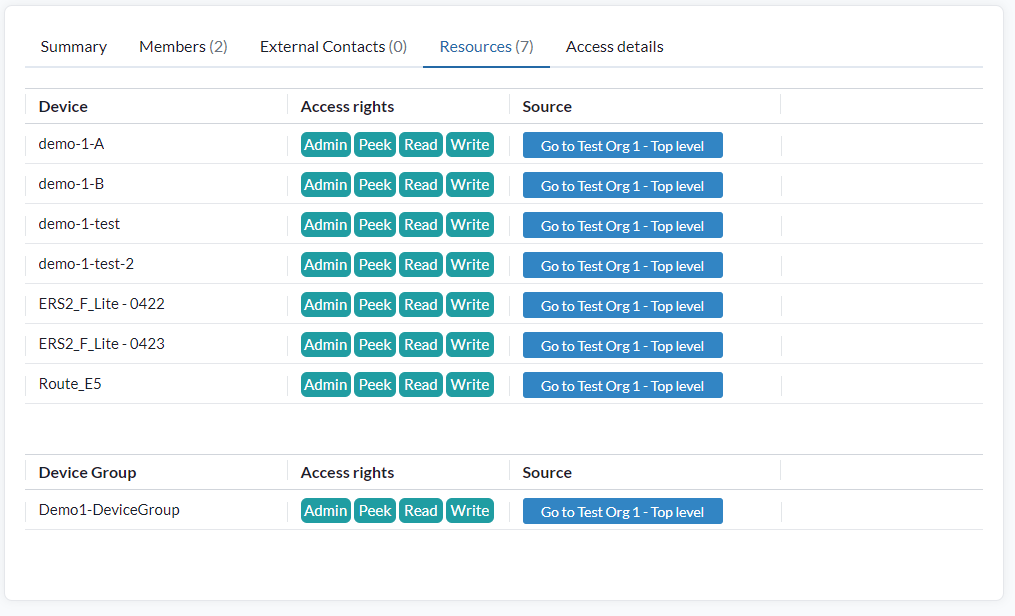
Everything shared into the organization, in one table per type, stacked: device, app, connector, report base, basic credentials set, dashboard, image, geofence and device group. A type with nothing in it is left out.
Each row shows the resource's access rights and a Source button naming a unit it is shared from, which jumps to that unit. Since a share grants every unit on the path from the root down, the button may name a unit further up - the root included - rather than the one the resource was actually shared at. The unit's own Resources tab is the reliable place to see where a share was made.
Resources you can only peek at are left out of these tables. Sharing is not changed from here - this tab is the organization-wide overview of what has been shared and where.
Each table pages on its own, 25 rows by default, and the page size goes up to 1000 for an organization with a large fleet.
Access details
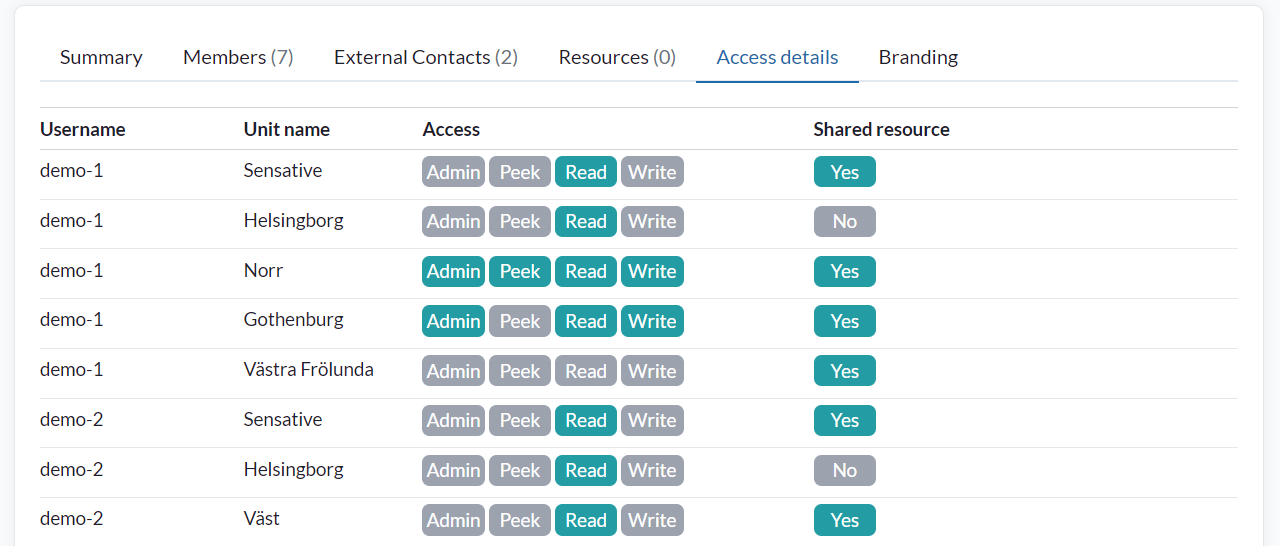
One row per user and unit, showing the rights they hold there and whether their own resources are shared at that unit.
It is the overview that answers "who can reach what", and the fastest way to set a new member up correctly: find somebody doing the same job and match their rows.
Everybody in the organization sees the tab, but it only has rows for what you may look at: for somebody who neither manages a unit nor administers the organization it is simply empty.
An organization unit
Everything above is Manage organization: the organization itself, who belongs to it, and what is shared into it. None of it grants anybody access to anything.
This is where access rights are managed. A unit is the only place access can be granted, so a unit has to be selected before there is anything to grant it on.
Clicking a unit in the hierarchy opens it. A unit behaves like a folder: it holds resources, and access granted here reaches everything below.
The root unit shows the organization's own name and description rather than the literal name "root".
A plain member - someone who is neither an organization admin nor manages a unit - sees less of the tree. They see only the units they have been granted rights at, each with everything below it, placed directly under the root; sibling units and the rest of the tree are hidden, and the only member they see is themself. A member with no unit rights yet sees just the root. Admins and unit managers see the whole tree.
Units have four tabs.
Summary
The unit's name and description.
Unit members
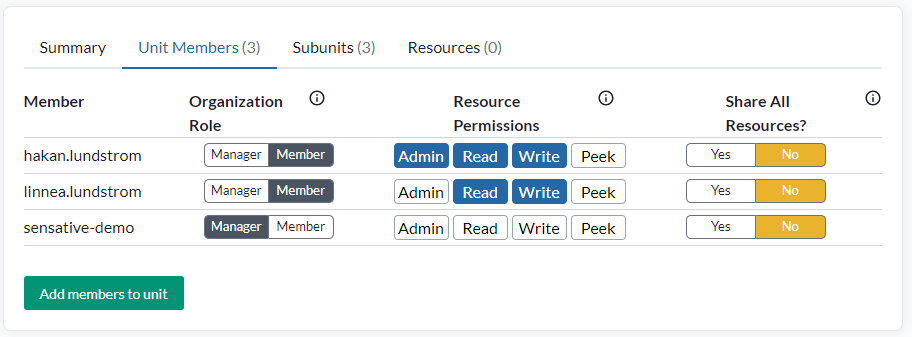
This is where access is actually granted, and it is reached by selecting a unit in the tree first. There is no equivalent on Manage organization: that pane lists who belongs to the organization, while this one decides what they can reach.
Each member of the unit has a row with four things on it.
Organization role is Manager or Member.
| Manager | Manages members and their access rights from this unit down the tree, including setting the platform role of any member other than themselves - as long as their own role is admin. Creating accounts and adding existing accounts to the organization stay with organization admins and the owner |
| Member | The default. No unit management |
Granting and revoking Manager both ask for confirmation.
Manager is held per unit, so granting it at the root unit covers the whole organization. It does not allow creating organizations - that is decided by the account, not by the role, as described under The organization.
Resource permissions are four chips. Click one to grant that permission, click it again to revoke it. Each is inherited by every subunit below.
| Admin | Manage the resources at this unit, including setting their access rights and deleting them |
| Read | Read data and see the resources |
| Write | Write data to the resources |
| Peek | The system may read the resources, but they stay invisible to the account holder. Mostly used to give access to connectors |
These are the same four levels as elsewhere in access rights.
Share all resources? is Yes or No. Yes shares everything the member owns at this unit, so everybody with access to the unit - direct or inherited - can work with it at their own access level.
Everything means every resource type, not only devices: device groups, dashboards, images, connectors, report bases, basic credentials sets, geofences and apps go with it.
Views are the exception, because a view is not a resource. It carries no access rights of its own, so nothing shares it in bulk. A view is passed on from the device list, one at a time.
Share-all follows the same rule as every other share - one unit per organization, and the same resources can go into several organizations. Turning it on at a second unit is refused while the first is still on. See One share per organization.
Both directions ask for confirmation, because turning it off revokes everything it granted.
Subunits
The unit's own subunits, where the branch below it is built out.
Resources
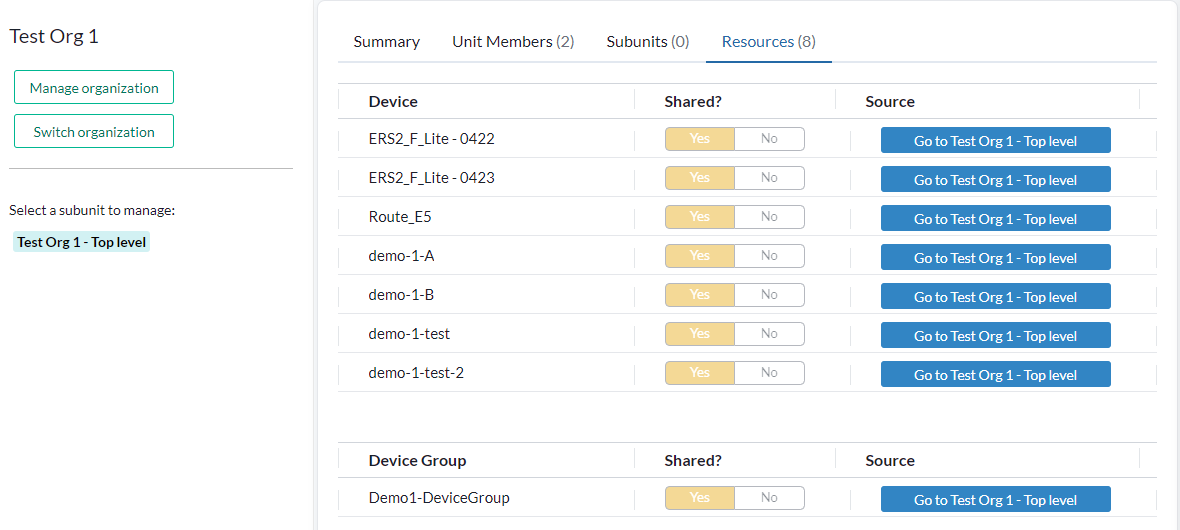
The resources available at this unit, whether shared here or inherited. This tab is an overview of what is reachable here, not where sharing is done - the only thing it changes is unsharing. Each row has a Shared? Yes/No toggle to the left of Source, which names the unit the resource is shared at.
Switching a row to No unshares it. It asks for confirmation first, naming the resource and the unit, and then removes the share entirely - from the unit it was made at and from every unit it reached from there. A shared device group is unshared the same way from its own row in the device group list.
The toggle is greyed out on rows that are only here through someone else's share - a member's Share all resources?, or a device group the resource belongs to. Those can't be removed one resource at a time, so change them where they were made: the member's share-all setting, or the device group's own row.
Branding
Branding puts your own name, logo and colours on Yggio, so the people you serve see your brand rather than ours. It is worth setting up: for a municipality or a property owner giving tenants access, the platform then looks like part of your own service.
Branding is an add-on. It is not switched on by default. Contact technical support to have it enabled for your organization.
Once enabled, it is set from the Branding tab of the organization. The tab is shown to an OEM administrator, and to the organization's owner when their account carries the branding add-on. Organization admins and unit managers do not get it.
| Tab | |
|---|---|
| Predefined themes | Five ready themes - default, blue, red, purple and grey - previewed before you apply one |
| Custom themes | Your own brand name, logo and primary colours |
The brand name appears in the top left corner of the application, and the logo is shown in the header and on the organization. The predefined themes change the navigation bar:



Custom themes go further: a brand name, an uploaded logo, and the ten shades of your primary colour, with a live preview beside the form. The result can be exported as JSON, which is how the same brand is applied to another organization without setting it again.

Note: a user who belongs to several organizations always sees the default Yggio brand, whichever brand those organizations set.
There is a fuller walkthrough in the training material.